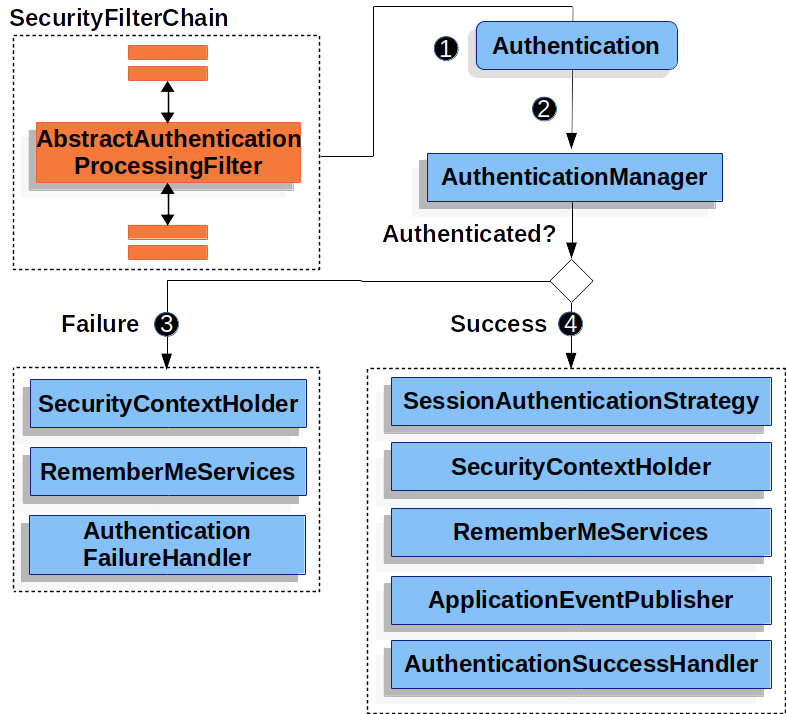
1 用户认证
1.1 用户认证流程
后端仅需返回json数据给前端
- 登录成功后调用:
AuthenticationSuccessHandler
- 登录失败后调用:
AuthenticationFailureHandler 如果我们想要返回json数据,需要实现
 AuthenticationFailureHandler 接口和 AuthenticationSuccessHandler 接口。
1.2 fastjson
引入json工具:
1
2
3
4
5
| <dependency>
<groupId>com.alibaba.fastjson2</groupId>
<artifactId>fastjson2</artifactId>
<version>2.0.52</version>
</dependency>
|
1.3 登录成功
AuthenticationSuccessHandler 的实现
1
2
3
4
5
6
7
8
9
10
11
12
13
14
15
16
17
18
19
| public class MyAuthenticationSuccessHandler implements AuthenticationSuccessHandler {
@Override
public void onAuthenticationSuccess(HttpServletRequest request,
HttpServletResponse response,
Authentication authentication)
throws IOException, ServletException {
var principal = authentication.getPrincipal();
HashMap<Object, Object> result = new HashMap<>();
result.put("code", 0);
result.put("msg", "登录成功");
result.put("data", principal);
String json = JSON.toJSONString(result);
response.setContentType("application/json;charset=utf-8");
response.getWriter().println(json);
}
}
|
这里采用了简单的HashMap返回,实际使用时可以考虑自定义响应类来返回。写完后需要在配置文件中装入这个类:
1
2
3
4
5
6
7
8
9
10
11
12
13
14
15
| @Configuration public class WebSecurityConfig {
@Bean
public SecurityFilterChain filterChain(HttpSecurity http) throws Exception {
http.authorizeHttpRequests(
authorize->authorize
.anyRequest().authenticated()
);
http.formLogin(login->login
.loginPage("/login").permitAll()
.successHandler(new MyAuthenticationSuccessHandler())
);
http.csrf(AbstractHttpConfigurer::disable);
return http.build();
}
}
|
此时去尝试登录成功,会获得以下json信息:
1.4 登录失败
AuthenticationFailureHandler 的实现
1
2
3
4
5
6
7
8
9
10
11
12
13
14
15
16
17
18
| public class MyAuthenticationFailureHandler implements AuthenticationFailureHandler {
@Override
public void onAuthenticationFailure(HttpServletRequest request,
HttpServletResponse response,
AuthenticationException exception)
throws IOException, ServletException {
String localizeMessage = exception.getLocalizedMessage();
HashMap<Object, Object> result = new HashMap<>();
result.put("code", -1);
result.put("msg", localizeMessage);
String json = JSON.toJSONString(result);
response.setContentType("application/json;charset=utf-8");
response.getWriter().println(json);
}
}
|
这里采用了简单的HashMap返回,实际使用时可以考虑自定义响应类来返回。写完后同样需要在配置文件中装入这个类:
1
2
3
4
5
6
7
8
9
10
11
12
13
14
15
16
17
| @Configuration
public class WebSecurityConfig {
@Bean
public SecurityFilterChain filterChain(HttpSecurity http) throws Exception {
http.authorizeHttpRequests(
authorize->authorize
.anyRequest().authenticated()
);
http.formLogin(login->login
.loginPage("/login").permitAll()
.successHandler(new MyAuthenticationSuccessHandler())
.failureHandler(new MyAuthenticationFailureHandler())
);
http.csrf(AbstractHttpConfigurer::disable);
return http.build();
}
}
|
此时去尝试登录失败,会获得以下json信息:
1.5 注销用户处理
需要实现 LogoutSuccessHandler 接口
1
2
3
4
5
6
7
8
9
10
11
12
13
14
15
16
| public class MyLogoutSuccessHandler implements LogoutSuccessHandler {
@Override
public void onLogoutSuccess(HttpServletRequest request,
HttpServletResponse response,
Authentication authentication)
throws IOException, ServletException {
HashMap<Object, Object> result = new HashMap<>();
result.put("code", 200);
result.put("msg", "注销成功");
String json = JSON.toJSONString(result);
response.setContentType("application/json;charset=utf-8");
response.getWriter().println(json);
}
}
|
同样需要装入配置中:
1
2
3
4
5
6
7
8
9
10
11
12
13
14
15
16
17
18
19
20
| @Configuration
public class WebSecurityConfig {
@Bean
public SecurityFilterChain filterChain(HttpSecurity http) throws Exception {
http.authorizeHttpRequests(
authorize->authorize
.anyRequest().authenticated()
);
http.formLogin(login->login
.loginPage("/login").permitAll()
.successHandler(new MyAuthenticationSuccessHandler())
.failureHandler(new MyAuthenticationFailureHandler())
);
http.logout(logout->logout
.logoutSuccessHandler(new MyLogoutSuccessHandler())
);
http.csrf(AbstractHttpConfigurer::disable);
return http.build();
}
}
|
2 请求未认证的接口
2.1 实现AuthenticationEntryPoint接口
当访问一个需要认证之后才能访问的接口的时候,SpringSecurity会使用 AuthenticationEntryPoint 将用户请求跳转到登录页面,要求用户提供登录凭证,同样我们需要返回 json 结果
1
2
3
4
5
6
7
8
9
10
11
12
13
14
15
| public class MyAuthenticationEntryPoint implements AuthenticationEntryPoint {
@Override
public void commence(HttpServletRequest request,
HttpServletResponse response,
AuthenticationException authException)
throws IOException, ServletException {
String localizeMessage = exception.getLocalizedMessage();
HashMap<Object,Object> result = new HashMap<>();
result.put("code",-1);
result.put("msg", localizeMessage);
String json = JSON.toJSONString(result);
response.setContentType("application/json;charset=utf-8");
response.getWriter().println(json);
}
}
|
将这个类装入配置文件中:
1
2
3
4
5
6
7
8
9
10
11
12
13
14
15
16
17
18
19
20
21
22
23
24
| @Configuration
public class WebSecurityConfig {
@Bean
public SecurityFilterChain filterChain(HttpSecurity http) throws Exception {
http.authorizeHttpRequests(
authorize->authorize
.anyRequest().authenticated()
);
http.formLogin(login->login
.loginPage("/login").permitAll()
.successHandler(new MyAuthenticationSuccessHandler())
.failureHandler(new MyAuthenticationFailureHandler())
);
http.logout(logout->logout
.logoutSuccessHandler(new MyLogoutSuccessHandler())
);
http.exceptionHandling(exception->exception
.authenticationEntryPoint(new MyAuthenticationEntryPoint())
);
http.csrf(AbstractHttpConfigurer::disable);
return http.build();
}
}
|
现在访问为认证的api时,将会返回如下信息:
3 获取用户认证信息
用户的所有信息存放于 Authentication 中
![[securitycontextholder.png]]
Principal :用户登录信息Credentials : 用户凭证Authorities :用户权限
在controller中我们可以按照这样获取并返回:1
2
3
4
5
6
7
8
9
10
11
12
13
14
15
| @RestController
public class IndexController {
@GetMapping("/")
public HashMap<Object,Object> index(){
HashMap<Object, Object> result = new HashMap<>();
Authentication authentication = SecurityContextHolder.getContext().getAuthentication();
Collection<? extends GrantedAuthority> authorities = authentication.getAuthorities();
result.put("code",0);
result.put("authentication",authorities);
return result;
}
}
|
4 会话并发登录
处理后登录的账号使先登录的账号失效的问题
实现接口 SessionInformationExpiredStrategy
1
2
3
4
5
6
7
8
9
10
11
12
13
| public class MySessionInformationExpiredStrategy implements SessionInformationExpiredStrategy {
@Override
public void onExpiredSessionDetected(SessionInformationExpiredEvent event)
throws IOException, ServletException {
HashMap<Object,Object> result = new HashMap<>();
result.put("code", -1);
result.put("msg", "您的账号已在其他地方登录,您被迫下线!");
String json = JSON.toJSONString(result);
event.getResponse().setContentType("application/json;charset=utf-8");
event.getResponse().getWriter().println(json);
}
}
|
在配置类中放入这个类
1
2
3
4
5
6
7
8
9
10
11
12
| @Configuration
public class WebSecurityConfig {
@Bean
public SecurityFilterChain filterChain(HttpSecurity http) throws Exception {
...
http.sessionManagement(session->session
.maximumSessions(1).expiredSessionStrategy(new MySessionInformationExpiredStrategy())
);
...
return http.build();
}
}
|
 如果我们想要返回json数据,需要实现